How to Remove Silicone Sealant: The Complete Step-by-Step Guide
Silicone sealant is one of the most reliable and versatile materials used in homes and buildings. It acts as a waterproof barrier in areas exposed to moisture, such as bathrooms, kitchens, and around windows. Over time, however, this once-smooth and protective layer can begin to discolor, crack, or peel away from surfaces, allowing water and dirt to seep in. When this happens, removing the old sealant and reapplying a fresh coat is essential to restore both functionality and appearance.
In this detailed guide, we’ll walk you through how to remove silicone sealant safely and efficiently. You’ll learn about the tools required, techniques for clean removal, ways to prepare for reapplication, and common mistakes to avoid. By following these steps, you can achieve a clean surface and a professional-looking seal that lasts for years.
Why You Need to Remove Old Silicone Sealant
Even though silicone is durable, it doesn’t last forever. Several factors contribute to its deterioration:
Moisture and Mold Growth
Bathrooms, kitchens, and windows are constantly exposed to humidity and water. Over time, mold and mildew can develop on the silicone surface, causing unsightly stains and unpleasant odors.
Wear and Tear
Daily use, cleaning, and exposure to chemicals can weaken the silicone’s bond. Eventually, it starts peeling or cracking, losing its waterproofing properties.
Discoloration
Sunlight, cleaning agents, and hard water deposits can cause the sealant to yellow or darken, making it look old and dirty.
Poor Initial Application
If silicone was not applied evenly or properly smoothed out the first time, it may not adhere correctly. This can lead to premature peeling and leaks.
When any of these issues arise, the best solution is to completely remove the old silicone and apply a new layer to ensure a tight, watertight seal.
Tools and Materials You’ll Need
Before you start, gather all the necessary supplies to make the process smooth and efficient.
-
Utility knife or razor scraper – for cutting and removing old silicone
-
Plastic scraper or old credit card – for delicate surfaces to avoid scratches
-
Silicone remover (commercial or homemade) – helps soften the sealant
-
Rubbing alcohol or white vinegar – cleans residue and disinfects
-
Cloths or paper towels – for wiping surfaces clean
-
Protective gloves – to shield your hands from sharp blades and chemicals
-
Hairdryer or heat gun (optional) – softens old silicone for easier removal
-
Masking tape – to protect surrounding areas during reapplication
Having everything ready before you begin will save you time and frustration.
Step-by-Step Guide to Removing Silicone Sealant
Step 1: Prepare the Work Area
Clear the area of any objects or decorations that might get in the way. If you’re working in a bathroom, remove toiletries, towels, and accessories. Make sure the surface is completely dry before you start. Moisture can make it harder to remove silicone and can reduce the effectiveness of sealant removers.
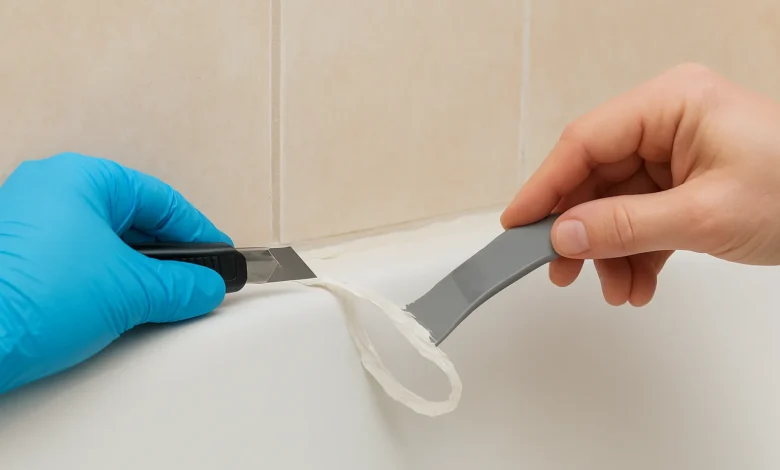
Step 2: Loosen or Cut the Sealant
Examine the old sealant for loose or peeling edges. Use a utility knife or razor scraper to carefully cut along both sides of the silicone bead. Make shallow cuts to avoid scratching tiles, glass, or other surfaces.
Once you’ve created an opening, gently lift the edge using a plastic scraper or your fingernail and start peeling the strip away. Try to remove as much as possible in one piece for easier cleanup.
Step 3: Apply Silicone Remover
After you’ve removed most of the sealant, there will still be a thin residue left behind. Apply a silicone remover product or a homemade solution (like white vinegar or rubbing alcohol).
Use a brush or cloth to spread it evenly across the remaining sealant. Allow it to sit for 2–4 hours (or as directed on the product label). The remover softens the silicone, making it much easier to scrape off without damaging the surface.
Tip: If you don’t have a remover, you can soften silicone by applying warm soapy water or gently heating it with a hairdryer.
Step 4: Scrape Away the Residue
Once the silicone has softened, use your plastic scraper to gently lift and remove the residue. Be patient and work slowly. Avoid using metal tools on delicate materials like tiles, enamel, or glass.
If stubborn spots remain, apply more remover or heat the area for a few seconds before scraping again.
After the majority of the silicone is gone, wipe the surface with a cloth soaked in rubbing alcohol or methylated spirits. This will remove any leftover adhesive and ensure the surface is completely clean and grease-free.
Step 5: Clean the Surface Thoroughly
Cleaning is a crucial step before applying new silicone. Mix a solution of liquid soap and warm water or use a specialty cleaner to remove dirt, grease, and any remaining residue. Wipe everything down with a clean microfiber cloth.
Let the area dry completely — moisture will prevent new silicone from bonding properly and can lead to early peeling or mold growth.
Step 6: Reapplying New Silicone Sealant
Now that your surface is spotless and dry, you can reapply new silicone to restore a watertight seal.
Prepare the Surface
If there’s any mold growth, spray the area with a mold remover and wipe it clean. Perform a spot test to ensure the product doesn’t cause discoloration.
Load the Caulking Gun
Cut the tip of your silicone cartridge at a 45-degree angle, making a small opening (around 5mm). Attach the nozzle and insert the cartridge into the caulking gun.
Apply the Silicone
Hold the gun at a 45-degree angle and apply steady pressure to create a smooth, even bead along the joint. Try to apply the sealant in one continuous motion for a professional finish.
Smooth the Bead
Immediately after applying, use your finger dipped in soapy water or a smoothing tool to even out the sealant. This helps it adhere properly and creates a clean, polished look.
Clean Excess Sealant
Before it dries, wipe away any excess silicone using a damp cloth. Doing this right away will prevent hardened clumps from forming.
Allow to Cure
Let the silicone cure for at least 48–72 hours before exposing it to water or steam. This ensures the seal sets properly and remains watertight.
Extra Tips for Best Results
-
Work slowly and safely — rushing may cause scratches or uneven application.
-
Avoid metal tools on tiles, glass, or painted surfaces.
-
Ensure good ventilation when using chemicals or removers.
-
Use quality silicone for long-term protection — especially mold-resistant varieties in humid areas.
-
Practice patience — removing silicone is a detailed task that rewards careful attention.
Frequently Asked Questions (FAQ)
Q1: How often should I replace silicone sealant?
Usually every 3–5 years, or whenever it shows signs of cracking, mold, or peeling.
Q2: Can I use vinegar instead of silicone remover?
Yes. Vinegar helps soften silicone and can be used as an alternative when removers aren’t available.
Q3: What if I don’t have a scraper?
You can use an old credit card or plastic spatula — these are gentle on surfaces and work well for lifting softened silicone.
Q4: Can I apply new sealant over old silicone?
No. New silicone won’t bond properly to old layers. Always remove the old sealant completely for a strong, watertight result.
Q5: Is heating silicone safe?
Yes, but use caution. A hairdryer on low heat is safe for most surfaces. Avoid direct, prolonged heat that could damage paint or plastic.
Conclusion
Learning how to remove silicone sealant properly can transform the look and performance of your home’s wet areas. With the right tools, patience, and methodical effort, you can strip away old, damaged silicone and replace it with a clean, durable seal that enhances both hygiene and appearance. Whether it’s your bathroom, kitchen, or windows, a fresh silicone line not only looks better — it protects better, too.